The Estate of Unrest This zone went live with
Live Update 32 as a free content addition to
Echoes of Faydwer, and became the second
Persistent Instance with
LU38. Unlike most zones where quests exist in the zone, this zone IS the quest, after a fashion. It is like an old
Zork or
Myst game, where various items related to the storyline lead you through unlocking the path until you reach the final encounter.
For a detailed guide to the zone, please see
here. A page with
Lore information is also available
This zone went live with
Live Update 32 as a free content addition to
Echoes of Faydwer. The encounters in this zone range from 72^^^ Heroic to 74^^^ Heroic, with one very deadly exception: there is one raid mob in the zone.
The Bugaboo is 80^^^x2 and walks around the grounds. He is very slow unless aroused and it is best to simply avoid him. He does not appear in the zone until you kill
The Sadistic Bartender (which also starts the 18-hour zone lockout timer).
Unlike most zones where there are quests IN the zone, this zone IS the quest, after a fashion. It is like an old
Zork or
Myst game, where various items related to the storyline lead you through unlocking the path until you reach the final encounter.
There are 7 Discovery Locations in
The Estate of Unrest.
As you progress through the zone, Garanel will taunt you with messages. These messages will appear below, indented and in
bold.
Notes:
In the following article, many items that must be gathered will be described in the order needed. Many of them may be collected in advance, and will be noted so. Also, many objects in this zone require you to right-click them in order to perform the desired action; simply left-clicking
will not work.
Several nameds, including
The Sadistic Bartender and
Screwloose the Mad Tinkerer, must con non-gray or they will not drop the necessary items to progress.
Trust Nothing!Throughout the zone, you will see things that appear to be familiar. Trust the voice of warning in the back of your head! A
Small Chest may not be the common sight you first take it for, and those who
seem to be your friends may not be so friendly. BEWARE! Shinies within the mansion have a chance to be fake; fake shinies will spawn an encounter of 3-4 mobs (^^ and ^^^).
Caution!All mobs in this zone see through both invisibility and stealth, and your
Evac spells will not function!
WARNINGThe various keys and such are
very important but are tradeable, so if someone leaves the group, be
sure they hand over any keys they have before leaving! If they do happen to leave without handing over the keys, talk to the ghost in the gazebo and a chest will spawn with the missing keys
The Grounds I sense an insect has crawled into my yard. This trespasser is not welcome in the home of Garanel!
 All mobs on the exterior of the mansion, with the exception of
The Bugaboo, are level 72^^^ or 73^^^ Heroic.
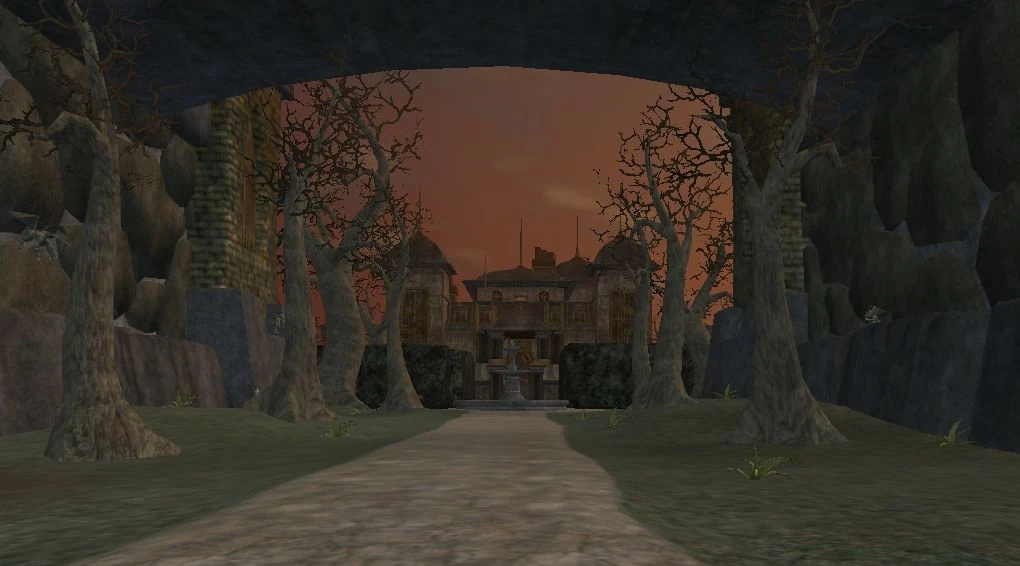
Entrance
The grounds as seen upon entering Lining the entrance are many stone imp-like gargoyles, called
Cucuy. Ahead of you is the
Fountain and the
Hedge Maze.
FountainThere is a chess piece in the water; gather it. It is one of 4 chess pieces that must be found for the
Game Room. If you have "Complex Shader Distance" set to -1, there is a bug which can mean the chess piece might be invisible. Set "Complex Shader Distance" to 2 or higher to solve this.
Hedge MazeAs you progress through the maze, watch carefully for the 2 halves of the Front Door Key. One half is in each half of the maze, and will be found in a dead end.
The Hallowed GazeboThe ghost of
Jessa Quellborn stands here. (It is also a discovery location: ( 109, 3, 95 ) )
A Warning and a GiftEditTake refuge here, for it will be the only place you find peace on this estate. I am Jessa Quellborn of Erudin, and this is my family's nightmare... Did you used to live here?
No, I passed from this world before this house was constructed. My husband and daughter called this place home before... the cursings. Centuries ago this was a place of rest and respite. My family devoutly followed the Goddess of Tranquility, Quellious. Nicadius, my husband, was a priest of Peace and dedicated these grounds to giving refuge to the weary and troubled traveler. My infant daughter, Jessa, named for her dying mother, was raised here. Tranquility and harmony reigned here... that was until he came... The murderer's name was Garanel Rucksif... fueled by envy, malice, and liquor he crept into the house and slew all the inhabitants in cold blood. As he struck down my husband in Her own humble chapel, Quellious cursed the murderer to never know rest! With that the dwarf fell, struck dead. Although Garanel haunted this place from that day, it was his punishment alone. That was until the priest of Fear discovered this place, drawn by the dark spirit. Through the vile power of Thule, he raised the dead and brought the darkness that now touches everything on these grounds. My good and loving husband buried me where this gazebo now stands. With proper rites and blessings in the Tranquil One's name I was laid to rest. Fear has no power over my resting place. But my husband and daughter... you must release them from this nightmare. You must destroy the dark heart of this place, the corrupted spirit of Garanel Rucksif. First gain entry to the house by finding the two parts of the front door key within the hedge maze. A Mother's Love...After you have freed
Jessa from the ghosts and spectres that were tormenting her, and have spoken with her father, return to talk to her mother. She will give you a locket in the hopes that her daughter might realize how much she loved her. Return with this to
Jessa Quellborn-Ruksif's Bedroom and give Jessa the locket.
MoatThere is a chess piece in the moat fairly near the Gazebo (100, -10, 138). Gather it. It is one of 4 chess pieces that must be found for the
Game Room.
Western YardThe Graves of UnrestA discovery location: ( -25, -1, 229 )
Eastern YardYou will find the ghost of a dwarf here, named
Kyll Ruksif, frantically fighting off
death beetles and other mobs. Save him.
Please... I must... speak to... you... Once you have cleared the area around Kyll, speak to him.
I... I am too... tired... to go on. Please... take my hammer... and save Jessa. I am... sorry... I failed you... my love. You receive
a ghostly hammer. Now go to
Jessa's Bedroom and use the hammer to force open the door.
NOTE: You can do this step before entering the mansion.Ground FloorYou must have the 2 halves of the Front Door Key from the
Hedge Maze to unlock the front door!
Get out of my house, trespasser! Entry HallKitchen and PantryThe only door on the southern wall of the back hallway leads to the kitchen.
Kill the
kitchen helpers, then click on the 2 cupboards in the Pantry to collect the
Rotted Vegetables and
Cursed Swine Meat. The
enraged hellcat will spawn. After you dispatch the un-nice kitty, go to the stove.
This stove was once used by the chef of the house to create extraordinary meals for visitors. The person with the recipe and the ingredients will need to right-click the stove and choose to
cook the meal. While doing this several
enraged cooks will spawn and attack the cook. The group must keep the mobs off the cook long enough to complete making the
Soothing Supper.
You call that filth you tossed together a meal?! Fitting... you strike me as the type that enjoys devouring pig slop! This dumbwaiter looks like it goes up to the second floor. It was used to carry prepared meals from the kitchen to the dining room. Now right-click on the dumbwaiter to
send the meal upstairs.
There is a chess piece on the counter by the stove. Gather it. It is one of 4 chess pieces that must be found for the
Game Room.
BarThe bar is in the southeast corner of the ground floor.
On the corner of the bar is a bottle of
Halasian Whiskey you can harvest. This is used in provisioning, makes
Halasian Icebrew.
There is a chess piece in a red goblet on the North end of the bar, the
King's Field Pawn. Gather it. It is one of 4 chess pieces that must be found for the
Game Room.
After killing all of the bar's patrons,
The Sadistic Bartender spawns, planning to pin you for the tab!
AS LONG AS HE IS NOT GREY TO YOU (this is no longer true as of 7/21/2011... I killed him when he was grey and he dropped the cocktail... Socko was here) he drops a
Very Watered Down Cocktail and
Tumpy's Tankard. If he is grey, he will not drop these items.
Jessa Quellborn at the Hallowed Gazebo will NOT give you the Cocktail in her box of missing progression items, and you cannot progress any further in this zone. (Update:As of 01/11/2011, just have 1 group member leave the zone then hail Jessa to get the cocktail, the member that left can re-enter the zone after you get it.)
You will pay for that, trespasser! That servant was loyal to me. You can now use a
Very Watered Down Cocktail to snuff the fire in the fireplace and retrieve the
Unrest Backdoor Key. This key unlocks the door in the back of the bar (at -35,4,175 ) leading to the
Eastern Yard.
Now you need to go to the
Eastern Yard and talk to the
Ghost of Kyll Rucksif.
Game RoomTo enter this room use the door in the back of the estate.
A note tells you that 4 chess pieces are missing. They can be found in the
Moat,
Fountain,
Bar and
Kitchen. Restoring the chess pieces summons
Screwloose the Mad Tinkerer and his
haywire clockwork! Bomb in a bag, bomb in a bag! Quick, who has the bomb?
Someone wants to finish the game, do they? Well I have a game for them to play! Bomb in a bag! HAHAHA!
Quick! Everyone check their bags, someone has a bomb! Destroy it or run to the far side of the room and take your 80% damage if you don't want to kill your friends!
Screwloose drops 2 VERY important items, 2
Screwloose's Lever Screws! You will need these to repair the levers in
the Towers. He also drops the amazing
Bag of Broken Cogs which produces a never-ending supply of thrown ammo!
Why is it I cannot see into your soul like all of the other filth that walks my halls? How do you hide it from me?The TowersThe first door in the east and west hallways lead to the towers.
You need the 2
Screwloose's Lever Screw (from
Screwloose the Mad Tinkerer in the
Game Room) to complete this stage.
Fight your way to the top of each tower, clearing them. At the top of each is a lever. Use the screws you found to repair them. Now, split your group: half to each tower. You need to count down and pull the levers VERY closely together. This unlocks the
Foyer, and the zombies in each tower will become active. You have two tanks and two healers, right?
Alternative: Have everyone standing at the main door leading to the center room, and one person with a screw each up after you cleared their path. Have them do the screw first then count for the lever ... as soon as that is done they should run down and meet the tank at the door so the whole group can kill the zombies which will slowly come (wait for them to be safe).
FoyerFoul trespasser! Disgusting interloper! You can't win! Why do you even try... LibrarySecond Floor
Conservatory
There is a piano here, but you need music to play it. Once you find the music (in
Hemstall and Ryline's Room, and take it to
Nicadius Quellborn (so he can finish it) you can return here and play it. Just like the stove, several
provoked musicians will spawn while you play the piano. Keep them off the pianist until the tune is finished. This opens a secret door in this room that leads up to the
The Defiled Chapel.
Your music is horrible! Your skill is pathetic. The sad thing is, that is the most talent you have displayed yet!Jessa Quellborn-Ruksif's Bedroom
Use the
ghostly hammer given to you by the
Ghost of Kyll Ruksif in the
Eastern Yard to batter down the door.
Seeing her suffering amuses me. Seeing your suffering will be exulting! There will be no finer pleasure than watching you writhe in pain! If there is a more bizarre tableau in all of Unrest, these eyes have not seen it. When you enter her room,
Jessa's spirit stands on her bed, agitation and crippling remorse in her every movement. Before her are 2 rows of ghosts: the first are
tormenting haunts, shaking their fingers at her and torturing her with reminders of her life and death. Behind that group stand a half-dozen
mocking children. Scattered around the room are a number of
manifestations of anguish.
She had no birth... she has no worth! Found murdered in cold blood... your death was two for one! You tried so hard for the perfect life... it all came to an end with the cut of a knife! Torment's EndLike the
Dementors in
Harry Potter, the manifestations are actually responsible for the tormenting of Jessa's spirit. Killing them will spawn a second wave of
manifestations in the corner by the children. Killing that group will aggravate the
mocking children and, after they are destroyed, the
tormenting haunts.
The tormenting... the ridicule... has it finally ended? They are gone, but still no rest. Eternal sorrow I suffer... my loss... my baby. The nursery? No! No one is to go in there! It was meant for a child that will never be born! That door must'nt ever be opened. It would destroy my heart to look upon it. No, you don't understand... you can't understand... the grief, the pain. I feel so alone. There must be someone who can help? With the banishment of the last of her tormentors, Jessa is freed. However, she still will not give you the key to
the Nursery, telling you it must remain sealed forever. Sounds like it is time to have another chat with
her father.
...Knows No Bounds!Once you have spoken to
Nicadius and
Jessa Quellborn again, return here with the locket her mother gave you, and give it to Jessa. The locket is given to you by Jess, the ghost in the gazeebo outside.
This is your mother's locket. She wants you to have it. My mother? I never knew my mother. She died before I can remember. But I always felt her spirit around me as I lived. Warm, caring, loving. I feel it radiating from this locket now. She says she loves you and understands the pain of loss you are going through. Thank you. I can feel the truth and her strength in your words. I am ready to give you the key, but you must excuse me for not wanting to look upon the room now. I don't have the strength for that yet. When you have reassured her of her mother's love, her sadness is at last lifted and she will give you the
Nursery Key. You may now proceed to
The Fallow Nursery NOTE: On launch day, Jessa's ghost was a male ghost in a mitered bishop's hat. I am sure SOE will fix this soon... The Fallow NurseryEditA discovery location: ( -18, 13, 142 )
Will you play with me? On the Nursery bookshelf, collect the
Incomplete Hymn of Tranquility. This needs to be taken to
Nicadius Quellborn so he can finish it.
Servants QuartersIn the corner you will find an
Oil Can. Gather it. Proceed to
the balcony and oil the lock mechanism.
Third FloorStudyThe Dining Room
A discovery location: ( -18, 13, 142 )
Nicadius's Master BedroomBehold the pathetic soul that once claimed this house. Know that I will kill you, trespasser, just as surely as I destroyed him! The shade of
Nicadius Quellborn sits on the bed. Initially, although you may encourage or curse him, he will respond to neither.
A Mother's Love...You have freed Jessa from her tormentors but she can't bear to give you the key to the Nursery. Speak with Nicadius! He will tell you that his daughter might know peace if she could only know how much her mother loved her! Go to
the Gazebo and talk to her about it.
Music Is the Key!EditYou have found the
Incomplete Hymn of Tranquility, but must return to the composer for help in finishing it. Once you have the sheet of music, take it to
The Conservatory.
BalconyThis step requires the
Oil Can found in the
Servants Quarters.
On the South side of the balcony you will find a lock mechanism in need of oiling. Use the oil can you got in
the Servants Quarters. This unlocks the door of
the Chapel.
I will have your soul! You can't keep it hidden from me for long, trespasser. The Defiled ChapelA Discovery location: ( 31, 24, 193 )
He always drops the
Polished Symbol of the Faceless. Use this symbol to unlock the bookcases hiding the passage down to the
Dungeon in the
Library. See his page for a list of the rest of his known drops.
You continue to upset me, trespasser... I will break your brittle bones! I will rend your soft flesh! I am god here!The DungeonYou want to see the mind of Garanel?! You want to see what shapes such nightmares?! Well, proceed trespasser, and witness my terror! After unlocking the secret door in the Library, you swing the bookcases back, revealing a hole in the floor leading down to the Dungeon. Proceed carefully! The mist hides many terrors, and some will appear to be friends!
The Torture Chamber of the Damned
A discovery location: ( 33, -14, 180 )
Why do you take steps that will only lead to your demise, trespasser? You know you can never win! Be sure to clear all of the jail cells! The Festering Hag will place a random player from your group in a jail cell for every 20% you knock off of his health. The jail cells do not open from the inside; you'll need to have someone let you out once you've been jailed. It is recommended that you have at least one player on the upper level to release group members from the jail cells.
Pool of Blood
I can feel your quickly beating heart. Excellent... The sound will lead me to your worthless soul. Then you will be mine! There are hidden pits on either side of the Hemogoblin's pool. Unless you're the explorer type, you'll want to run straight through the pool of blood to get to the other side of the room.
I see now where you hide your soul, trespasser... You sit there all smug thinking you are safe behind your pane of glass. Well you are no longer safe from me!The Heart of UnrestA discovery location: ( -25, -32, 67 )
Look upon the relics of my mortal coil and tremble... for it will be the last thing you see in your pathetic life! BEWARE! All of the mobs in this room respawn until Garanel has been summoned.
In this room (which seems to have expanded a bit since EQ1), you'll find a number of
fragments of Garanel surrounding
shards of Garanel. In the center of the cavern,
Garanel's Shade will spawn every 2 minutes. He will automatically aggro on your group as soon as he spawns;
even if your group happens to be elsewhere in the zone! If the shade is up, fog will cover the ground within the cavern; the fog will dissipate once the shade is killed.
Each shard of Garanel will drop a body part. There are seven body parts (7 shards) in total. On the center pillar rests Garanel's suit of armor. Once you've got all seven body parts, return to the center pillar and click
each part of Garanel's armor. After all 7 pieces of armor are filled, Garanel himself will spawn. Garanel has much higher HP than any of the other (Bugaboo aside) bosses in the zone; be prepared for a long(ish) fight.
Collection QuestsThere are several
Category:Collection Quests unique to the Estate of Unrest.